
Shield
Widget Modes
All three modes run the same verification pipeline — the only difference is what the visitor sees. No mode ever shows a puzzle.
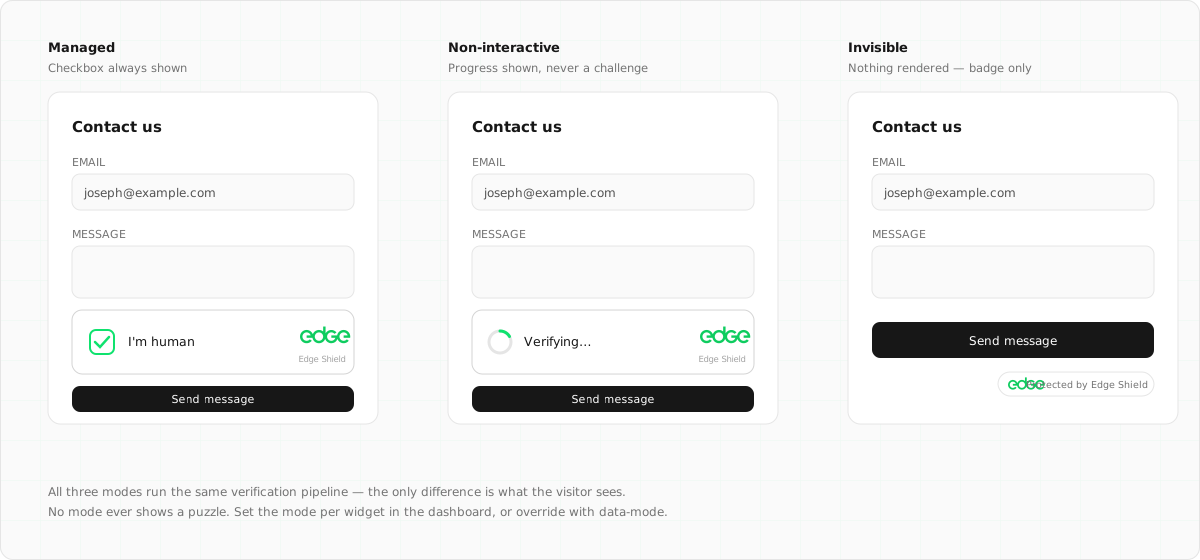
Managed
RecommendedVerification is invisible for real users. If the humanity score of a background attempt is low, the widget escalates: it shows a single "I am human" confirmation, and the click triggers a harder proof-of-work challenge. Most visitors never see it.
Best for: signup, login, and checkout forms — anywhere you want maximum protection with a human fallback.
Non-Interactive
Background verification with a small status badge ("Verifying… / Verified") so visitors can see protection is active. Never asks for input — traffic that fails simply doesn't receive a token.
Best for: contact forms and comment boxes where a visible trust signal is useful.
Invisible
No visible widget at all. Verification runs on page load, or on demand via
the JS API
(edgeShield.execute()).
Because there is no visible element, there is no interactive escalation — low-scoring
traffic fails silently.
Best for: seamless UX on login pages and SPAs where you handle low scores server-side.
Per-Widget Behaviours
Two further switches sit alongside the mode in the dashboard. They change how verification behaves, not what the visitor sees:
Shadow Mode
Report-only
Nothing is ever blocked: managed mode stops escalating, and
siteverify
always returns success — with what strict enforcement would have decided
reported in a shadow
object and counted in analytics.
Best for: trialling Shield on production traffic with zero risk of inconveniencing a real customer, then switching enforcement on once the numbers look right.
Tarpit
On by defaultClients that keep failing — wrong solutions, too-fast interactive answers, repeated low-score escalations — are served progressively harder proof-of-work. Each repeat offence quadruples the compute cost of the next attempt; one successful verification clears the slate immediately.
Persistent bots pay an exponentially growing electricity bill; a human who stumbles once pays a few hundred extra milliseconds. Disable it per widget if you'd rather repeat failures stay cheap.
Setting the Mode
The mode is configured per widget in the dashboard (Shield → widget → Settings) and takes
effect on the next challenge issued — no redeploy needed. You can also override it
per-placement with data-mode:
<!-- Set per-widget in the dashboard, or override per-placement -->
<div class="edge-shield" data-sitekey="es_..." data-mode="invisible"></div>
Data Attribute Reference
| Attribute | Default | Description |
|---|---|---|
data-sitekey | required | The widget's public sitekey |
data-mode | managed | managed, non-interactive, or invisible |
data-callback | — | Global function name called with the token on success |
data-error-callback | — | Global function name called with an error string |
data-expired-callback | — | Called when a token expires (the widget auto-refreshes afterwards) |
data-input-name | edge-shield-response | Name of the hidden form input the token is written to |
data-compat | — | Set to turnstile to also populate a cf-turnstile-response input |